Tag Archives: photography

Street Photography

21 May

Street photography is typically known as capturing people and places in a public space. To me it is all about the unplanned. Weegee once said, “People are so wonderful that a photographer has only to wait for that breathless moment to capture what he wants on film.” In my opinion, I think this perfectly describes street photography.

One of my favorite photographers would have to be Harvey Stein. He is a professional photographer based in New York who does amazing street photography. For 40 years he photographed Coney Island in black/white film. He once stated that, “Coney Island is about people, it’s the people that intrigues me and what I am always drawn to to photograph.” One day I hope to visit Coney Island and capture the amusement park similarly to how Harvey Stein once did.

When I first started photographing the streets it was a little nerve wrecking. I had a constant fear that people were going to catch me and get mad. That never happened though. The few times I did get caught, I just smiled and they went about their day.

When’s the best time to shoot?

Although I have only shot street photography on a couple occasions, I like to shoot generally in the evenings. This is because the quality of light is better at this time. I also find concentrating on a small section or a corner gives me better results rather than walking around a city.

Ways to blend in with the crowd when shooting street scenes: 

  1. Wear dark clothes.
  2. If you keep your camera around your neck, keep the strap high. This way there is less movement when you are bringing your camera to your eye.
  3. When shooting, keep your elbows in.
  4. Have your camera settings preset.

 Examples of Harvey Stein’s work

ImageImage

 Image

Decisions

19 May

Lately, I have been researching a lot of different universities with photography programs. Two that originally stuck out to me were Langara and Emily Carr. I applied at Emily Carr in January but after I sent off my application I learned that their photography style is more directed at nature, while I prefer fashion and portraits. This brought me to the decision that I will either go to Langara or UFV, maybe both.

Langara is known for having a great photography program and I would go there in pursuit of a certificate. One nice thing about attending Langara is that after you graduate you can always go back and take other photography courses for free. I have been debating about going to UFV for a year and taking some of their photography courses and then switching over to Langara afterwards. This way I could live from home and save up.

As fun as photography is, it can be expensive. I am currently saving up for a new camera body. The body I currently have my eye on is a Nikon D800, it will definitely be an upgrade from my D3000. It is often believed by clients that the better camera you have, the better your photos will be. As untrue as this is, it’s not like we can train everyone’s mind to stop believing this, so it will be nice to have a camera that people will not judge.

D800 vs. D3000: http://snapsort.com/compare/Nikon-D800-vs-Nikon_D3000Image

Image

Lighting

15 May

In my opinion every photographer should have a basic knowledge about studio lighting, even just lighting in general. By just a flick of a switch, lighting can change the whole mood of a photograph.

My favorite kind of lighting is natural. I enjoy shooting my models outside and positioning them according to where the sun is. Photography outdoors can be a little difficult because you can never fully be positive about what kind of weather you have to work with. Personally I kind of like the challenge, I feel like every time I figure out a away to work with the rain or to bright of a sun, I become a better photographer.

Studio Lighting

Why do we use it? Studio photography gives you complete control of your setting, you can get exactly what you want out of a subject and if you are a tremendously creative person, studio lighting becomes your best friend!

Lighting control

It is very important in studio lighting to have accessories to change the harshness of light. For example, soft light is generally generated by an umbrella or soft box attached to a light and results in shadow free images. Hard lighting, on the other hand, is generated by a small and/ or faraway light with nothing blocking the light source from the subject and results in strong shadows.

What You Need

–       A good lighting space: a room with preferably no windows

–       A tripod (optional)

–       Paper or fabric background: generally black or white

–       A willing subject: It’s no fun to take pictures of someone who doesn’t want to be there

doll_photography_lighting_example1

Types of lighting

Soft: Lighting that is low or moderate in contrast, such as on an overcast day.

Hard: Lighting that creates contrast between shadowy and well-lit areas.

Side: Lighting that falls on subject from the side relative to the camera position.

Back: Lighting coming from behind the subject.

Top: Lighting that comes from above a person or object.

When at a Shoot

14 May

Everyone has different ways of escaping their problems. For me, that is one of the benefits of photography. When I hold a camera in my hand I begin to look at the world differently. I pay more attention to the smaller details, little things that can change what a shot looks like. I constantly think about how I can get the outcome I’m looking for. I would have to say that my favorite moment is when I hear a shutter close after I have just taken the exact photo I was hoping for.

Before I begin a shoot with a model I imagine what that perfect image will look like. I determine what pose I want them in, what background they will have behind them and what mood I would like to set with the image. After that I kind of just let them do their thing while adding pointers along the way. Generally once they are comfortable, the poses they pick let their personalities shine through. If a model doesn’t seem relaxed then I usually will help them out with the poses and work on making them feel at ease.

Being a model is not always the easiest thing if you are not used to being the center of attention. For me, I find being the subject of the camera gives you a different feeling from being the photographer. When I model I feel very aware of myself whereas when I am taking the photographs I kind of zone out. While I am shooting I try to remember what its like to be the model so I can do a better job of interpreting their body language.

Managing-the-Light-Metz-50-AF-58-AF-2-Flash-Photographer-and-Model

Star Trails

16 Apr

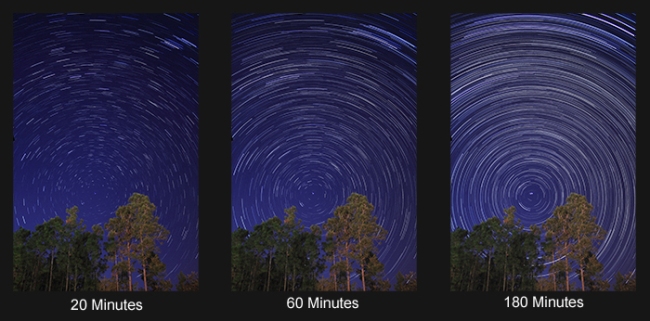
Star trails can create some of the most beautiful night photography images. The reason I love to photograph them is because I think it is amazing that with just a long shutter speed you can see the path has taken in just one photograph.

The way I capture star trails is by shooting multiple exposures and combining them later on. For this tutorial to be effective you should know the general relationship between Shutter speed, Aperture and ISO. If you don’t I recommend checking out this site, http://www.exposureguide.com/exposure.htm

What you’ll need:

  • Digital SLR Camera
  • A Tripod
  • A wired shutter release with a mechanism to lock the shutter down

Before you start make sure that the night is dry and clear. Set up your gear in a place where you have an open view of the sky but still compose it with some trees. Then focus your camera on a bright star. Once the camera is focused turn off auto focus so it doesn’t get confused.

For my aperture I will generally use f/5.6, with a shutter speed of 30 seconds. My ISO is always the lowest ISO necessary, starting at 200 and being at a max of 800.

Once everything is set, press the button on your shutter release, lock it down, and you are good to go.

The Finished Product

One thing I’ve noticed is that airplanes get into the shots if you photograph close to a city. I get rid of them by using clone stamp so the finished product looks better. It can take some time but generally it is worth it. Now that your photos are ready it is time to put them all together. For my star trail images I use Image Stacker. It costs $17 to get the full version and I find it very useful for combining all your images. To start click the “Add Images” button.

Image